
HipScreen Ruler Apple iOS Tutorial
HipScreen Ruler Apple iOS Tutorial
Dr. Vedant Kulkarni:
Hi. My name is Vedant Kulkarni and I'm a pediatric orthopedic surgeon at Shriners Hospitals for Children in Northern California. Let's get started with a demonstration of how to use the HipScreen app on your Apple iOS device. After you open the HipScreen app, select the third tab to open the migration percentage ruler.
The first step is to load an X-ray onto the ruler. You can do this by selecting the camera icon to take a photo of an X-ray. To reduce any concerns of health privacy, if you take a photo of an X-ray within the HipScreen app, it is not saved to your device. If you already have taken a photo of your X-ray or your child's X-ray outside of the HipScreen app and have it saved on your device, you can use the photos button to load the photo into the app.
Let's start by taking a photo of a pelvis X-ray. We recommend that you stay in landscape mode when taking a picture of the X-ray so that it displays properly within the app. Press the use photo tab if you want to use this photo, or you can retake it as well. Once it displays, the next step will be to rotate the X-rays so that it is level.
Press the rotate button and a new menu will appear. You will notice that there are multiple gray horizontal lines across the screen. You'll use these lines to level the pelvis using one of the four landmarks we taught you in one of the previous tutorials. Let's use the triradiate cartilage, our top choice for landmark to level the pelvis in this example. Watch as I pan and zoom the image so that the landmark is more visible.
I'll use the CCW button to rotate the image counterclockwise and the CW button to rotate the image clockwise. It's correctly placed when the horizontal line goes through both triradiate cartilage in the same area. Here, I'm leveling it so that the horizontal line meets the lateral aspect of the triradiate cartilage on both hips.
Once this is complete, I'll press the done button. Now my rotation is locked in and I can pan out of the image with the pelvis locked and leveled. The next step is to activate the ruler overlay so that we can measure the migration percentage of each hip. When I press the ruler button, an overlay appears.
Notice that as I zoom in on the image, the size of the ruler doesn't change. This allows us to fit the X-ray to the ruler, allowing for quick measurement of the migration percentage without moving lines on the screen. Notice that the ruler has two sides. We'll use the left half for the hip on the left half of the screen.
Now, I'll pan and zoom the image until the white line touches the lateral aspect of the femoral head, and the black line touches the medial aspect of the femoral head. One trick is to turn the ruler overlay on and off by pressing the ruler button so that you can double check that your landmarks are appropriately positioned on the ruler.
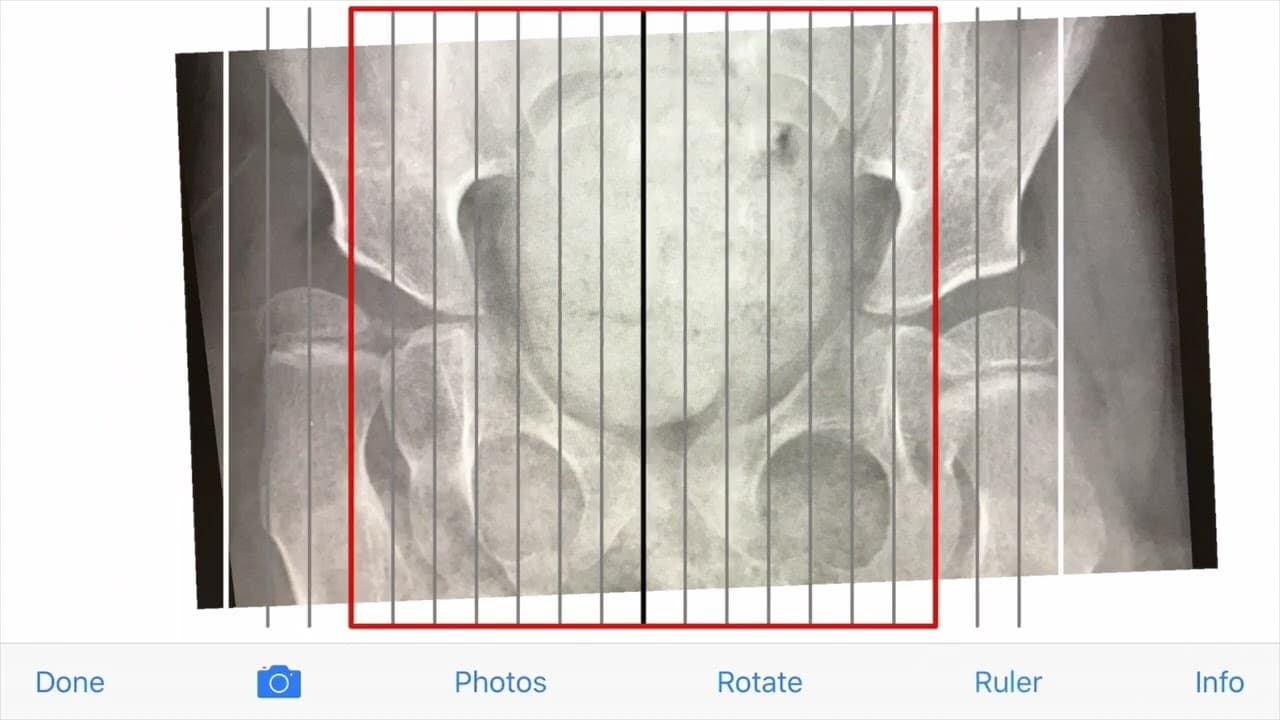
Once appropriately positioned, the femoral head is divided into 10% increments by vertical lines. The white line is the starting point for your measurement. Starting at the white vertical line, each gray line is a 10% increment of the femoral head. Notice that the third line is actually red. To measure the migration percentage, start at the white line and count which vertical line intersects the lateral edge of the acetabulum.
In this case, it is the sixth vertical line from the starting white line, so 60% of the femoral head is lateral to the edge of the acetabulum. The migration percentage is 60%. If the edge of the acetabulum falls between two gray lines, you can still estimate the migration percentage to the nearest percent.
Now, notice that the edge of the acetabulum is inside of the red box. If the lateral edge of the acetabulum is inside the red box on either hip, the migration percentage must be 30% or greater, and a referral to a pediatric orthopedic surgery specialty center for continued hip surveillance management is warranted.
Let's move to the right hip. Now, we'll repeat the same steps with the right half of the ruler. Again, we're trying to get the white line to touch the lateral aspect of the femoral head and the black line to touch the medial aspect of the femoral head. Now that the femoral head is appropriately positioned, notice that the third vertical line from the starting white line touches the edge of the acetabulum. It's the red line, so the migration percentage is 30%.
We can turn the ruler on and off to make sure that we agree with the placement of these lines, which seem to be accurate. The measurement of migration percentage using the migration percentage ruler can be fast and accurate. Visit www.hipscreen.org for more tutorials and information. Thanks.